Sunday, February 27, 2011

Pesto 101

 Triple Green Power Pesto Bruschetta Pizza            

 Swiss Chard, Kale & Spinach Pesto w Roasted Garlic & White Beans
 
Somehow the month of February became “pesto” month at the Delaney’s it is just so funny because I talked about making pesto for months (maybe even a year or more you know how quickly time passes us by ;-), I just remember looking at it in the grocery store and seeing the fat content and the CHEESE and thinking it was just something that we wouldn’t/couldn’t eat.  I couldn’t have been more wrong now with an educated vegan eye pesto is not only EASY to make at home it is vegan and the possibilities are… endless and it is packed with fibre, iron, antioxidants, calcium and protein.  To date I have now made 4 variations of pesto and last night proved to be the winner.

It all started with this bunch of swiss chard that I bought (I had to start somewhere) I starred at it for 2 days in the fridge wondering what I was going to do with it so I started reading about it learning that it is not only a super food it is ranked the 2nd healthiest food (next to spinach) then it came to me… “swiss chard + spinach pesto” so pesto was born into our kitchen this was batch number one it was fantastic, we tweaked things and decided to do the exact same thing with kale it was also delish, naturally our third batch was swiss chard, kale + spinach almost perfection except celery root… you maybe thinking what?! So in my cooking I try to elimated salt all together I know that it is essential for flavouring and so on so I heard from a dear friend that celery root acts as a natural salt in cooking so I decided this was the perfect addition to our final pesto tasting… and it sure was you would honestly think there was salt in it, it completed the flavour in a perfectly babyized way.  So I look forward to using celery root to replace salt in all kinds of soups and sauces now… I am not sure how long it will keep for so we have grated it all up and froze it in ice cube trays so we can pop it out as a salt replacer in almost anything (except baking I am not sure how that would fly in cookies haha).

Before we get to the recipe why eat kale or swiss chard?

Kale is often a vegetable that people are intimidated by or they don’t even know what it is or what it looks like.  Kale is nutrient dense packed with more calcium then a glass of cow’s milk and more easily absorbed, it is also high in folic acid important for child rearing years, and it may increase milk supply in breast feeding mothers.  You want to select kale that is firm and crisp like not brown or wilted, you can store in a plastic bag in refrigerator it is best used up within a few days of purchase.  Most people don’t like the “chewy” like texture of kale, but it can easily be used chopped as parsley, added to salads or steamed, pureed, frozen and added to ANYTHING – smoothies, tomatos sauces, chilli (I did this a few weeks back and you wouldn’t even know), I can mix a cube of kale into any of Julia’s purees without a second thought.


How does swiss chard add up to Kale?

Swiss chard is very popular in Mediterranean cuisine, it comes in green and red (we have tried both) and is ranked the second nutrient dense food following spinach.  High in vitamin K, A & C (vitamin C is important as it helps maximize the absorption of iron).  It has a great taste raw and we have found it to add a nice crunch to our spinach salads.


After trying each in a solo pesto with spinach it became obvious that they all must be married into one pesto...

 So here you have it…Triple Green Power Pesto Brushetta Pizza

Swiss Chard, Kale & Spinach Pesto w Roasted Garlic & White Beans

2 cups of spinach
6 cups of kale, chopped
8 cups of swiss chard (green or red), chopped
1 cup of fresh basil, chopped (when fresh from garden I would use 2 cups)
1 roasted garlic bulb
1 medium onion, diced
1 cup of toasted walnuts (or nut of choice we did use toasted cashews for the kale pesto)
1 ½ cups of white beans cooked fresh or a can well rinsed
½ cup grated celery root (salt replacer)
Fresh juice from ½ lemon
¼ cup of olive oil + 2 Tbsp for sauté + drizzle on garlic
Fresh ground pepper to taste

1)      Take one bulb of garlic, slice the top off, set in a tin foil bed (see photo) drizzle with olive oil and a few sprinkles of parsley, roast in oven @ 350F for 35-45 min, until golden brown (you can even roast this a day ahead to save time)


2)      Rinse, chop and prepare all your greens (swiss chard, kale and spinach), dice onion and peal and grate celery root (pictured below).


3)      Saute onion & garlic over medium heat in a large skillet with 2 Tbsp of olive oil, once softened add basil, celery root and garlic until fragrant.  Add swiss chard and kale, cover with lid steam over medium heat for about 10min until softened and cooked down add spinach cover steam for 2-3min, stir in white beans and walnuts until warm.


4)      Remove from heat put in food processor add lemon juice, olive oil and fresh ground pepper, pulse until desired texture and presto you have PESTO 


5)      Serve as desired featured here is with brushetta pizza, we also served over pasta with a side of roasted red peppers, zuchinni and crimini mushrooms – both are delish but the brushetta pizza was our favourite.


6)      You may store in fridge for 3 days, freeze in ice cube trays for baby (over 12 months because of walnuts and later if you have a family history of nut allergies), or freeze in a container or ziploc bag for an easy meal (we have enough pesto in the freezer now for a few months haha)

Bruschetta

3 medium tomatos, diced
½ cup fresh basil, chopped
4 cloves of garlic, finely grated
1 small red onion, finely chopped
1 Tbsp of balsamic vinegar
1 tsp of coarse sea salt (optional we didn’t use this)
1 Tbsp of olive oil (we omitted this as we were having it with the pesto)

 1)      Chop and prepare tomatoes, basil, garlic and onion in a small bowl stir in balsamic vinegar and set aside in refrigerator until ready to use – doesn’t keep well so you want to use all in the same day.

Hub*’s Basil Infused Pizza Crust

1 cup whole wheat flour + ½ cup to add as needed
1 tsp of dried basil
2 Tbsp olive oil
2 ¼ tsp of yeast (we used quick rise)
1 tsp sugar
2/3 cup of very warm water

1)      Combine flour, basil and olive oil in a bowl
2)      Mix up warm water, sugar and yeast, add to flour stir until mixed the knead the dough with your hands for a few min on a floured surface adding additional flour as needed so dough is not sticky
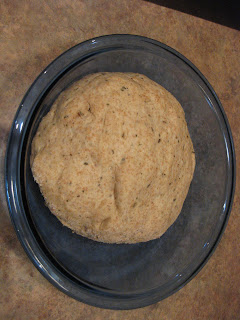
3)      Place in a bowl, cover with a clean towel and place in a bag allow to rise 15min (unless you are using regular yeast then it will be longer follow instructions on the jar) - this is the dough after it rose (I forgot a picture before oppsie!!)
 4)      Dough should be double size after it has rose, work out the air and smooth onto you pizza pan or stone (we need to get a pizza stone), place in the oven 425F x 10-12 min
5)      Pull crust out lightly brush with 1-2Tbsp of olive oil, top with pesto and your brushetta mix, turn oven down to 350F bake until warmed through about 5-10min
6)      Slice and serve with a side spinach and swiss chard salad and maybe a glass of red wine… unless of course you  are serving to your toddler formula will be option of choice J

This is a very labour intensive meal, preparing the pesto a day ahead or having ready made in the freezer will make for a quicker dinner, but this is a perfect Saturday night dinner when you may have a little extra time in the kitchen… we are officially pestooooo’d out for a few weeks any way.

Enjoy your Sunday!!

Mark and Jessica

(my husband was a huge contributor to the photos and preparation of this meal so I need to give him credit)

We have one tiny slice of pizza for Julia to try at lunch… she has been loving her pesto with quinoa or pasta and pureed red peppers… time for a little mix up sans bruschetta, it is so fun watching her taste buds blossom she had brussel sprouts yesterday with parsnips and it was heaven and earth she couldn’t get enough… she has just learned to "roar" like a lion so she thought that it would be cute to take a picture of a lion from her puzzle haha :-)


Coming up next the long anticipated DIY Baby Food part #2… we have a busy day in the kitchen re-stocking veggie purees… 

This was the Devine Classic P-Nutty Fudge that I made for dessert last night... recipe to come!


Friday, February 25, 2011

Simply Pure Baby's 1st Pancake "Cake"

Good morning and happy Friday!!  Well I am absolutely delighted to see that I have a few more followers and that I am getting some random comments here and there as a new blogger it is so motivating to know that there are people reading things on the other side.  I wanted to comment further on Baby's 1st Muffins I have experimented further with a few batches tonight I am going to revise the recipe removing banana as optional as I tried with and without and the muffins are sturdier with the banana - so I do hope that fixes things for anyone who didn't have luck... allowing your "flax" egg to gel up is also an essential step hope that helps... in vegan baking there are many different tricks to getting things to "stay" together... flax egg is one of my favorites packs a nice punch of "hidden" omega's as well!!

So a few weeks ago my hubby piloted baby's 1st pancakes as you will recall:


They turned out great but I felt that there had to be a better way to make pancakes... so I baked a pancake "cake" (using my pancake batter) and it turned out beautifully... no fuss no mess a healthier alternative to frying pancakes added bonus all the pancakes are ready at the same time so this is a perfect breakfast for your family to all eat together.

Simply Pure Baby's 1st Pancake "Cake"
Wheat Free - Egg Free - Dairy Free
1 cup Oatmeal flour (you can purchase or grind your oatmeal into flour)
1 1/4 cup Large flake oatmeal (processed into smaller flakes in food processor, optional)
1/2 cup Spelt flour (or flour of your choice)
1 tsp baking soda
1/4 tsp baking powder
1 cup non-dairy milk (I used whole organic soy milk) with 1 tsp lemon juice (to make 'sour' milk)
2 egg replacers (2T of flax + 6T water allow to 'gel' before mixing with other liquids) or you may use eggs
2T maple syrup
1 ripe banana, mashed

1) Preheat oven to 350F, line a 9x13" pan with parchment paper.  In large bowl stir together flour, oat flakes, baking soda and baking powder until blended, in a small separate bowl mix egg replacer and allow to sit for a  few min until it 'gels'.

2) Add milk, egg replacer, banana, milk and syrup to the dry mixture stir until just mixed (avoid over stirring). 

3) Place in oven 15min or until edges are lightly brown, allow to cool for 10min then remove from pan and slice into desired shape (you could even cut them with cookie cutters to make them fun) top with pure maple syrup or your favorite pancake toppings (remember this is a pancake "cake" so they are not meant to be sweet - for extra sweetness add an additional 2 tbsp of maple syrup) OR for traditional pancakes omit baking powder.  Heat frying pan over medium heat, lightly oil pan place 3/4c of batter in pan, cover with a lid let sit for a few min (2-3) until the center begins to bubble, then flip, flatten if desired cover and cook a few more min (photos above). 


4) Serve immediately while warm or store in refrigerator for up to 3 days, or simply freeze in an air tight container (you have probably realized that I freeze everything it's a fantastic way to always have healthy food choices at your finger tips - we'll talk about my frozen homemade vegan cookie stash at another time haha).


Makes the perfect breakfast for babies and toddlers that want to feed themselves chop into sticks or cubes serve +/- banana, place on their tray also makes a quick healthy breakfast for mom or dad.

Variations - you could add 1/2 cup infant cereal instead of spelt flour, you could add 1/2 cup unsweetened apple sauce instead of banana, you could add blueberries, ground flax, bran, liquids would have to be adjusted accordingly of course... possibilities are endless... let your baby be the guide...

So as you can imagine juggling family, work, exercise and cooking that I am always fitting things in when I can so sometimes I don't get all the pictures that I want (especially) the mixing process and such... my intentions are good and will continue to be... I know the step by step pictures are helpful.  


Yesterday Julia and I were out running a bunch of errands and we stopped at the Stone Store it's this great little health store in town here, they seem to have everything that you could ever need in there we weren't up for browsing we just needed some brown rice syrup and sucanat.  Once we got home Julia was crawling all over holding this bag of sucanat like her favorite doll (wish I had a picture) which got me looking at the bottle of brown rice syrup and started making me think about the difference between all these sweeteners... agave nector, honey, maple sryup, brown rice syrup, corn syrup, brown sugar, sucant and the list goes one... so it became obvious to me that I need to do a post on "sweeteners" what to use when etc... Do you have a favorite sweetener that you use in your baking?

Hope you and your family can enjoy a pancake "cake" this weekend... let me know if you make any variations and how they worked out? I love new ideas I am feeling raspberry pancakes might even sweeten with a splash of our homemade jam... speaking of new things I follow this blog Oh She Glows and she is always talking about "VOO" aka "vegan overnight oats" I was complete skeptic cause you don't actually "cook" the oatmeal but curiosity got the best of me and I have some sitting in the fridge for breakfast this am... will keep you posted if they are as good as everyone raves I will be babyizing the recipe this weekend.

Alight time to go... coming up next all about pesto - February has been pesto month in our household and it is time to unleash what has unfolded... I think March is going to be bread month... time for me to face my fear of "making" bread... :-) Have you ever made bread? Any tips or tricks?


Enjoy your weekend take some time for yourself - simply -  pure - wonderful...

Jessica  :-) 

Thursday, February 24, 2011

Introduction of Solid Foods

What when and how...

I am not sure how nearly a week has passed by without a post…1 sick little baby is the answer tis the season for colds and flu we are all once again healthy in this household.  Julia is getting ever so close to walking she will stand and you can tell that she wants to step and then she will squat down and crawl playing it safe haha! Other new things this past week Julia ate her baby proof pesto (I have renamed February pesto month at the Delaney's so I will be doing a full post on that before the end of the month) and chilli with much delight, she is also loving her new raspberry baby’s first muffins and my hubby on the other hand has been enjoying some new vegan treats “Devine Classic P-nutty Fudge and Lucy’s Pecan Pie ‘pieless’ Cookie Bars” (yes little Lucy you some how inspired this name, one of my dear friends of 20+ years just had a little baby and we brought some treats over there last weekend) all recipes to come of course :-)  

As a new mom there is a never ending list of things that you are trying to figure out and just when you think you got it bam it all changes... introducing solid food is a huge developmental milestone for baby (and mom) so I hope to dymystify some of that in this post...

Alright introduction of solid foods... we have talked a little bit about how to make your own baby food (part 2 is coming) we have reviewed finger foods, and I have given a brief overview of intro to solids now we are going to get into the nitty gritty.

How do you know your baby is ready for solid foods:
  • 6 months old
  • Able to hold head up and sit in high chair 
  • Tongue thrust reflex is gone (this is a defence mechanism that baby’s have prevent choking when they are smaller)
  • Smacking lips when watching others eating
It is recommended that babies are exclusively breastfed or formula fed for 1st 6 months of life and solids starting a 6 months there is no right or wrong order of what to introduce when you can start with rice or oat cereal or you can start with squash or avocado.  When you are starting solids you want to start very slowly starting with a tablespoon of cereal and gradually increasing as your baby tolerates it, the first time you feed your baby he or she may only take 1 teaspoon.  When first introducing solid foods you want to start with a very runny soup like consistency and thickening it up as your baby tolerates it.

Here is a basic outline (I have included vegetarian options in italics):

6-8 Months

Grain: oat, barley, quinoa, ground flax
Veggies: peas, butternut/acorn squash, sweet potatos, carrots, green beans, parsnisps
Fruit: pears, prunes, avocado, apricots, plums, mango, nectarines, peaches, pumpkin, apple, banana
Protein: garbanzo beans (chick peas), black beans, organic tofu  

8-10 Months

Grain: millet, kamut, wheat, rye, bran
Veggies: spinach, broccoli, cauliflower, asparagus, cucumber          
Fruit: berries (blueberries, raspberries, blackberries), cantaloupe, honey dew, cherries, cranberries, dates, grapes, papaya  
Protein: kidney beans, lentils (brown, green, red), romano beans, full fat yogurt (gelatin free do you know what gelatin is made from click and check it out…)

10-12 Months

Grain: wheat germ, spelt, multi-grains (after they have had each grain separately), you can start to explore bagels, breads, crackers, breadsticks as your baby tolerates texture (just be sure to check the labels if you are not making it yourself scarey things in some bread products ;-)  
Veggies: beets, eggplant, kale, swiss chard, bok choy, onion, garlic, peppers, mushrooms, tomatos, leek, corn, edamame                                       
Fruit: strawberries, kiwi**, oranges, figs
Protein: egg yolk (it is advised to save egg whites till after 1 year due to the high chance of an allergic response), homoginized cow’s milk (after 12 months)

**strawberry and kiwi are from the same family so if your child has a reaction to one wait for the other also if you have a strong family history of allergies you will want to introduce as your baby gets older talk to you health care provider specifically about this.

Please note there are a variety of references of what to introduce when, this is what we did something different will work for everyone for example you may find certain foods cause constipation (eg sweet potatos) so you want to avoid them or you may find your baby apprehensive to trying new flavours and foods take it at your own pace remember a lifetime of healthy eating starts now!

Now you have an outline of what to introduce when but what about how?

When trying new foods you want to offer small amounts (maybe ½ tbsp), you want to offer new foods in the morning so that you can watch for signs of an adverse reaction throughout the day and you always want to wait 3-4 days between new foods so you can see how your baby responds to them.  In the beginning we waited 4 days and it felt like Julia would be 5 years old before she had tried everything haha!!

Be patient healthy eating starts here we still wait 3-4 days between new foods and spices. For example last week I started Julia with some edamame for finger food 1st day she wasn’t interested she pushed them aside ate the peas and black beans we did the same things for 3 days and on day 3 she would only eat the edamame, it is fascinating seeing their little taste buds blossom.  If you try something for 3-4 days and they are still resistant try it again in a week or two it can take 7-12 tries before a baby/toddler really gets a taste for something.  You will also find with the 3-4 day wait rule very quickly 6-8 month foods become 8-10 month foods simply by waiting the days in between.  I also found it helpful to keep some kinda log of what you introduced and how your baby responded I will post a sample… sleepless nights and the business of the days can easily blur new foods and responses together.
 
It is also important to remember for the first year of life breast milk and/or formula are the baby’s main source of nutrition, so you always want to give milk before solids and remember solid foods under 1 year of age are simply for learning the mechanics of eating and not for nutritional purposes - having said that naturally choosing the right foods will have some nutritional benefit but let's face it you baby is not going to gain weight from eating fruits and veggies, that comes from the milk.

I thought that it would also be helpful to review the forbidden foods under ONE year of age:

Allergenic foods: cow's milk, egg whites, soy, nuts, wheat, shellfish
Infectious risks: soft cheeses and honey
Choking risk: grapes, rasions, cherry tomatoes (so babies can eat these but you need to cut them up and keep a close eye on them)
Not advised for babies: salt, sugar, juice (so many parents will give there baby juice or put a splash of juice to flavour their water it is not recommend juice is empty calories as far as flavouring the water baby's taste what you give them so let them try some simply pure water and get a taste for it naturally).

Well I sure hope that this demystifies some of the queries in introducing solids I am going to compile this list into a chart and I will post it once I do :-)

Your questions of the post: How did you introduce food to your baby?  What are some of your baby’s favourite foods?

Coming up in DIY Part 2:
Simply Pure's basic veggie purees 
Cost analysis of buying commercial baby food versus making your own baby food
Why buy seasonal produce? What is in season when?
Spices and babies what is ok? 

But first Baby's 1st Pancake "cake" here is a preview Julia had them for breakfast and they are officially stamped baby approved - I discovered that baking my pancakes into a cake is a simply, healthy, quick and easy way to always have pancakes ready to go... daddy thought so too when he got pancakes on a Thursday morning for breakfast haha...


Of course I couldn't conclude without a picture of our little princess loving her new car...


Thursday, February 17, 2011

Finger Lickin' Good

In the first year of life babies learn more than at any other time in their life, if you think about it a baby is born with enough skills to survive eating and making dirty diapers.  Then right before your eyes they are holding their head up, squeezing your finger then holding a toy (I remember the first time Julia held her rattle we were so excited), then they start wiggling, wanting to stand, enjoying tummy time, rolling over, clapping, waving, splashing the water, sitting up, making all kinds of sounds "maaa-maaa" is one of my favorites haha, eating – first learning how to swallow then to chew and before you know it they are picking up food and feeding themselves and walking or running and the list goes on… I am sure you get the point what a joyous time the first year is, thankfully people (in Ontario) now have the option of taking that first year to be with their baby alright… zoning in on a baby’s grip – did you know a newborn is born with enough strength to hold themselves on a chin-up bar incredible isn’t it?  Julia has recently started a gymnastics class and to our surprise 1st time on the bars she was holding herself up at 12.5 months old wow, but with much practice they can do it much sooner!! This is Julia last year at this time 2 months old... I just felt like showing a flash back.


When we think about it, it is really amazing how babies “grab” things they start by cupping things with their hands and somewhere around the 7-8 month mark you will notice your baby developing a “pincer grip” where they are able to pick things up between their thumb and index finger – so watch out for any small things on the floor as they will go straight to the mouth.  Why do babies LOVE putting everything in their mouth? Because they have many sensors in mouth and it is very satisfying for them to put things in their mouth and suck.

Alright so babies have the ability to pick up food with fingers around 7-8 months so at that time you can start with finger foods so many people will start with “puffs” as they will dissolve in babies mouth posing no choking hazard and they teach them how to start to “chew” or “gum” the food preparing them for foods they need to breakdown.  Alright so "puffs" of what?  First I have to tell you a story I was at a playgroup and a mother was feeding her baby what appeared to be “puffs” so my curiousity got the best of me as it usually does and I asked her what they were she responded “puffs” I proceeded to ask puffs of what? And she said “I don’t know they are no-name from the grocery store” ok… I was dumbfounded like how could you not know what “puffs” you were feeding your baby… anyways everyone is different :-) 

The majority of puffs that parents will start babies on are rice but we already talked about this babies eat tiny little bits so why would you fill them up on white rice puffs? Our situation was compounded as Julia doesn’t eat rice (for digestive health) so I went on a search I quickly found you could buy puffed anything I came home with puffed barley, puffed kamut, puffed wheat, puffed millet and puffed quinoa… ok I went a little over board but who knew all these grains came in “puffs” so we sampled them all decided that the wheat dissolved best, kamut second, barley third, the millet and quinoa are very tiny and therefore not suitable as a finger food as it would be very difficult to pick up (see picture).   

 
So now we make up a bag of “cereal” with puffed wheat, kamut, barley and nutrios.  Nutrios are basically like cherrios sans salt, & sugar and they are fortified making them a perfect finger food as well. 


Here is a little list of healthy finger foods for your little one I have included vegetarian options in italics:

Grains
  • Puffed grains (wheat, kamut, barley)
  • Nutrios
  • Rye bread (read labels carefully many breads are full of sugar, molasses, salt & milk)*
  • Crackers (I make my own see recipe)
  • Baby’s 1st Banana Pancake (recipe coming soon)
  • Breadsticks (recipe coming soon picture below) 
  • Well cooked pasta
*sometime in the very near future I am going to attempt my very 1st loaf of bread
 
Salt-Free Rosemary Breadsticks
Fruit
  • Grapes cut into 8 ish pieces (decrease risk of choking)
  •  Honey dew or cantaloupe cut into chunks (cantaloupe freezes well so you can always have some ready)
  • Pineapple
  • Pear or apple cut into chunks, strips or grated
  • Peach or nectarine cut into chunks 
  • Dried fruit apricots, figs, prunes, raisins, dates (baby’s love dried fruit because it is so sweet)


Slippery Fruit/Veggie Tip: lightly dust with infant cereal or nutrio dust giving it enough texture to pick up
Veggies
  • Lightly steamed asparagus, broccoli, cauliflower, zucchini, celery, carrot, turnip or parsnip sticks or chunks (see picture I steam them then lay on parchment paper to individually freeze before putting into a bag)
  • Green peas, edamame, avocado
  • Grated fresh carrot (I do this whenever I don’t have steamed one’s cause Julia loves carrots)
  • Cucumber in chunks or strips 
  • Lightly steamed chunks of beet or sweet potato   
Protein
  • Beans: garbanzo, black, kidney or any other bean  
  • Chunks of tofu
  • Chunks of egg yolk or cheese 

This is by no means a comprehensive list of finger foods this is what has worked for us as Julia is getting older it naturally keeps growing so let the creativity begin.  Toddlers can be tricky to feed as they start to know what they want for example they will like bigger “sticks” to chew on instead of tiny pieces to pick up, but they can’t communicate that to us so it is this guessing game (unless you have some sign language that you use), you don’t always want to cater to their every food request or you will develop a picky eater so always remember to offer variety you decide what goes on their plate they decide how much if any they will eat…

Coming up next chart of what to introduced when… it was funny when I was first trying to figure all this out I sorted all the foods by colour and then realized that wasn’t really a good way to introduce them but it was a great way to brainstorm all different foods and see the rainbow of possibilities out there, I'm sure it will be a fun game as Julia get's older to make sure she chooses a wide variety of colorful foods.

What are your babies favourite finger foods? How do you serve them?  

Also I want to do a little reader poll: If your baby only has 2 bites of their dinner left do you try to get them to take it? Will discuss in next post “come on only one more bite…” is it worth the frustration it can pose... meal times are fun so let's keep them that way!!

Have a happy Friday - leading into a nice long weekend!!