I just sat down to polish up my post for today and was just making my rounds on the computer first and much to my surprise my recipe Two Bite Double Down Dark Chocolate Brownies WON a Valentines Day Contest from Oh She Glows how exciting!! And motivating to get this posted so I can bring on my Valentines post... I made a special Valentines dinner tonight Roasted Garlic and Kale Pesto with White Beans over whole wheat bow tie pasta topped with oven roasted red peppers and crimini mushrooms it was DELISH!! Quite possibly one of the best things we have ever had and oddly enough we had the Two Bite Brownies for dessert tonight topped with fresh strawberries.
Ok back on track DYI Baby food...
So you have decided that maybe you would like to make your own baby food… but just don’t know where to start this guide will help.
The choices that you make now regarding your baby's food will have life long effects. Not only are a tonne of nutrients lost from commercially jarred baby food (due to the high temperatures of canning them) but they have a shelf life of ‘years’ doesn’t that seem a little strange that a jar of canned baby peas could be good from now till 2014? Not to mention taste… would you want to feed your baby something that you wouldn’t eat? Give it a try buy a jar of baby pea puree try it along side your baby puree and decide for yourself. When you make your own purees they taste delicious just like the actual food making all these baby puree’s has showed me you can make anything into a puree and if you have extra use up the puree in baking (eg. pumpkin puree in muffins) or a soup (squash, carrot, parsnip anything really). There are a multitude of reasons to make your own baby food: taste, cost (will discuss further in part 2), more nutritional and you are able to play with the textures of the food. However, the point of this post is not to convince you to make your own baby food if you are reading this I am sure that you have already decided that.
So lets get started…
You don’t need any fancy equipment to make your own baby food but you do need a few essentials: a couple of knifes, cutting boards, spatulas, measuring cups/spoons, ice cube trays, storage containers (or Ziploc freezer bags), a pot and steamer and a blender/food processor.
There are many different ways to “cook” your babies food: steaming, boiling, roasting, and poaching (used more for meats) and braising (your slow cooker).
Next step is to select your produce you want to chose local seasonal produce whenever possible (will discuss more on seasonal produce in part 2), you want to chose fruit that has no bruising or cuts, you want it to be firm or ripe (depending on when you will be cooking it) as you can see these bananas are ready to go I actually used those for granola bars not for Julia... oppsie (it is rare that I get bananas that color in out house as we go through a tonne of 'nanners) so... when I buy a bunch of fruit that needs ripening I always put into 1 bowl (usually a big one) so they can spread the love and ripen eachother!
In this post I am going to an over view of simply pure basic purees pears, plums and apples. The process for each is very similar. These are all suitable for babies after 6 months of age in part 2 we will discuss what to introduce when and what to avoid. Under 1 year of age it is recommended that all fruits are lightly steamed to help babies break down the sugars.
Here we go:
Simply Pure Pears (of your choice, bartlett, bosc, d’anjou)
1) Wash the fruit thoroughly
2) Peel the fruit (optional, I peeled everything while Julia was <12 months)
3) Cut pear in ½ and core it out with paring knife or a melon baller (to decrease waste and maximize yield)
4) Meanwhile bring pot of water to a boil, place pears in steamer and gently steam 3-5min (longer if the fruit is not ripe)
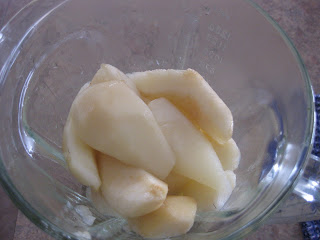
5) Put fruit into food processor, reserve some of the cooking water for pureeing as needed, puree to desired texture as this is a staple puree as your child advances to chunks you pulse pears a few times making a chunkier mixture - yes that is pears in the bowl below they turn darker after sitting for a few minutes
6) Allow mixture to cool then pour into ice cube tray and freeze
7) Once frozen put into storage container and place back in freezer take out as needed
Simply Pure Plums (red or black)
We have fine tuned this procedure over time we used to cut them in 1/2 , fight with the pit, steam them then fight with the skin… no longer…
1) Wash the fruit thoroughly, remove any steams, preheat oven to 350F
2) Cut and “X” through the plum right to the pit and all the way from top to bottom, cut out and marks in the skin
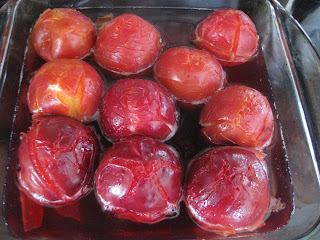
3) Place ½” of water in bottom of a baking pan, place fruit with “X” down in the pan (although they will roll around I am sure that it doesn't really matter), cover with tinfoil and bake 25-35min depending on the ripeness of your fruit to check if done stick a fork in fruit to check for softness
4) Once done remove fruit with a slotted spoon, remove the pit (this will be very easy the plum with split in your hand discard the pit and place plum into blender repeat for remaining plums, puree to desired texture (it is unlikely that you will need to add water as plums are very juicy once they are baked) **
 |
 |
5) Repeat steps 6&7 above
**re: skins if you choice to remove the skins as I did till Julia was about 9 months take the hot plums put in ice cold water and the skins will peel off (this is a similar procedure as peaches will discuss further soon when we review all fruits)
Simply Pure Apples (gala, macintosh, honey crisp, granny smith, fuji, red prince… lots of variety have fun try new one’s, you can even mix and match for example try a sour granny smith with a honey crisp)
1) Repeat process from pears – although may need to steam 7-10 min as apples tend to be a little harder the pears
2) Add a sprinkle of cinnamon if you like, it is good to mix up flavours on your baby getting her used to a variety (discussion of spices and babies to come)
*I usually make really big batches of everything more time consuming up front but then you are not making your basic purees all the time and you will always have some stock in the freeze it always amazes me how we are always running low on something. Having your partner help is also an asset especially when it comes to peeling pears, my husband is a pro haha!
When first introducing foods to baby you may choice to strain your fruits removing any larger fragments and fibres I remember the first time I did this to peaches I could not believe how much was stuck in the strainer. You can do this until your baby starts to get used to textures and then straining is no longer required.
Well how simple is that? There you have it, the process for Simply Pure’s three basic fruit purees, veggie purees to follow with DIY Baby Food Part 2.
Are you making your own baby food? What tips or tricks do you have?
Upcoming DIY Baby Food Part 2:
Simply Pure's basic veggie purees
Cost analysis of buying commercial baby food versus making your own baby food
Why buy seasonal produce? What is in season when?
What to introduce when? And what to avoid?
Spices and babies
Stay tuned... we have perfected Baby’s 1st Muffins it passed our taste test and more importantly Julia’s (& one of her little friends) it is wheat free, dairy free and egg free... recipe to be posted next!
Enjoy the rest of your weekend!
Have you planned a special Valentine's Dinner? or made a special Valentine's treat?
Jessica


These look fantastic! can't wait to see the muffin recipe. They look so cute! For pears -is it healthier to puree them raw or poach them first?
ReplyDeleteIf they are ripe and your baby is over 1 year puree them raw as that would preserve the most nutrients if under 1 y and ripe I still lightly steam them just to aid w digestion :)
ReplyDelete